# react_native_template
**Repository Path**: qhwww/react_native_template
## Basic Information
- **Project Name**: react_native_template
- **Description**: No description available
- **Primary Language**: Unknown
- **License**: Not specified
- **Default Branch**: main
- **Homepage**: None
- **GVP Project**: No
## Statistics
- **Stars**: 0
- **Forks**: 0
- **Created**: 2024-12-05
- **Last Updated**: 2025-10-29
## Categories & Tags
**Categories**: Uncategorized
**Tags**: None
## README
# node 版本
- "node": ">=18.20.4 || <=20.15.1"
# pod 版本
- 1.16.2
# xcode 版本
- 16.0
# ruby 版本
- 3.3.6
###
```
brew update
brew install ruby
echo 'export PATH="/usr/local/opt/ruby/bin:$PATH"' >> ~/.zshrc
source ~/.zshrc
ruby -v
sudo gem install -n /usr/local/bin cocoapods
```
# 1. react-navigation
```
# 安装
npm install @react-navigation/native
# 将依赖安装到裸 React Native 项目中
npm install react-native-screens react-native-safe-area-context
# 安装原生堆栈导航器库
npm install @react-navigation/native-stack
# 安装元素库
npm install @react-navigation/elements
# 安装tabs-bottom
npm install @react-navigation/bottom-tabs
# 安装处理手势和交互
npm install react-native-gesture-handler
# 安装高性能动画的库
npm install react-native-reanimated
```
# 2. ant-design
## 2.1 安装 antd-mobile
```
npm install @ant-design/react-native
```
## 2.2 安装 antd-mobile 图标库
```
npm install @ant-design/icons-react-native
```
### 2.2.1 链接字体图标
- 将字体资源路径配置到根目录下的 `react-native.config.js` 文件中 ( 如果没有,请创建 ):
```
module.exports = {
assets: ['node_modules/@ant-design/icons-react-native/fonts'],
};
```
- 然后执行 `react-native-asset` 的命令,字体文件将会自动复制到`ios` 和 `android` 资源文件中:
```
npx react-native-asset
```
## 2.3 使用 Modal 以及 Toast
- 还需要在 `App.tsx` 处加上 Provider
```
import {Provider as AntdProvider} from '@ant-design/react-native';
function App(): React.JSX.Element {
return (
);
}
```
## 2.4 按需加载
- 使用 babel-plugin-import(推荐)
```
npm install babel-plugin-import --D
```
- 在.babelrc 或 babel-loader 或 babel.config.js 配置
```
{
"plugins": [
["import", { libraryName: "@ant-design/react-native" }] // 与 Web 平台的区别是不需要设置 style
]
}
```
## 3. 路径别名
```
npm install babel-plugin-import --D
```
- 在.babelrc 或 babel-loader 或 babel.config.js 配置
```
plugins: [
[
'module-resolver',
{
'root': ['./src'],
'alias': {
'@components': './src/components',
'@assets': './src/assets',
'@hooks': './src/hooks',
'@router': './src/router',
'@store': './src/store',
'@utils': './src/utils',
},
},
],
],
```
- 在 tsconfig.json 配置
```
{
"compilerOptions": {
"baseUrl": "./src",
"paths": {
"@components": ["./components"],
"@assets": ["./assets"],
"@hooks": ["./hooks"],
"@router": ["./router"],
"@store": ["./store"],
"@utils": ["./utils"],
"@components/*": ["./components/*"],
"@assets/*": ["./assets/*"],
"@hooks/*": ["./hooks/*"],
"@router/*": ["./router/*"],
"@store/*": ["./store/*"],
"@utils/*": ["./utils/*"],
},
}
}
```
# 4. mobx 全局状态管理
```
npm install mobx mobx-react
```
## 4.1 babel 兼容注解@
```
npm install @babel/plugin-proposal-decorators --D
```
```
plugins:[
['@babel/plugin-proposal-decorators', { legacy: true }],
]
```
## 4.2 使用 mobx
### 4.2.1 创建一个 store
```
# store/modules/app.js
import { makeAutoObservable } from 'mobx';
class App {
constructor() {
// 自动将类中的属性和方法变为 observable 和 action
makeAutoObservable(this);
}
isLoading = false;
change () {
this.isLoading = true;
setTimeout(() => {
this.isLoading = false;
}, 2000);
}
}
export default new App();
# store/index.js
import app from "./modules/app";
export { app }
export default {app};
```
### 4.2.2 注入 store
```
import React from 'react';
import AppRouter from '@router';
import {Provider as AntdProvider} from '@ant-design/react-native';
import {Provider} from 'mobx-react';
import store from '@store';
function App(): React.JSX.Element {
return (
);
}
export default App;
```
### 4.2.3 使用 mobx
```
import {observer} from 'mobx-react';
import {app} from '@store'
const CustomTracking = () => {
return
{
app.title
}
;
};
export default observer(CustomTracking);
```
# 5. 环境变量
```
npm install react-native-dotenv
```
- 在.babelrc 或 babel-loader 或 babel.config.js 配置
- 注意:process.env.ENV_OPTION 由 npm run 执行时注入,详情参考 6
```
plugins:[
[
'module:react-native-dotenv',
{
moduleName: '@env',
path: `config/.env.${process.env.ENV_OPTION || 'dev'}`,
blocklist: null,
allowlist: null,
safe: false,
allowUndefined: false,
verbose: false,
},
],
]
```
# 6. 项目启动
## 6.1 app 安装
- `--device:`指定一个已连接的真实设备来启动应用
- 使用 `xcrun simctl list` 查看已连接的设备
- `--simulator:` 参数启动指定的模拟器
- `xcrun simctl list devices`列出可用的模拟器
```
"ios": "react-native run-ios --device qhw",
```
## 6.2 文件监听服务
- debug 模式下文件监听服务启动
- adb reverse tcp:8081 tcp:8081 是安卓服务启动
- `ENV_OPTION`为全局环境变量(node 环境可以通过`process.env`获取)
- `--reset-cache:`清除缓存(为了每次都会执行 babel.config)
- 如果提示文件太大请先`brew install watchman`
- 如果下载 watchman 依然提示文件太大,请在根目录下重新执行`npm install`
```
"start:dev": "adb reverse tcp:8081 tcp:8081 && ENV_OPTION=dev react-native start --reset-cache",
"start:test": "adb reverse tcp:8081 tcp:8081 && ENV_OPTION=test react-native start --reset-cache",
"start:pre": "adb reverse tcp:8081 tcp:8081 && ENV_OPTION=pre react-native start --reset-cache",
"start:prd": "adb reverse tcp:8081 tcp:8081 && ENV_OPTION=prd react-native start --reset-cache",
```
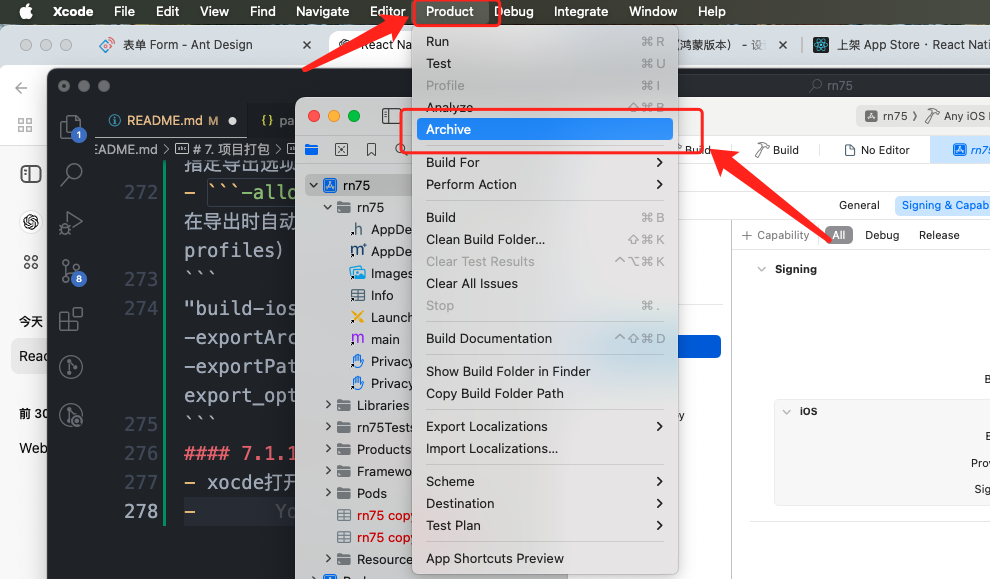
# 7. 项目打包
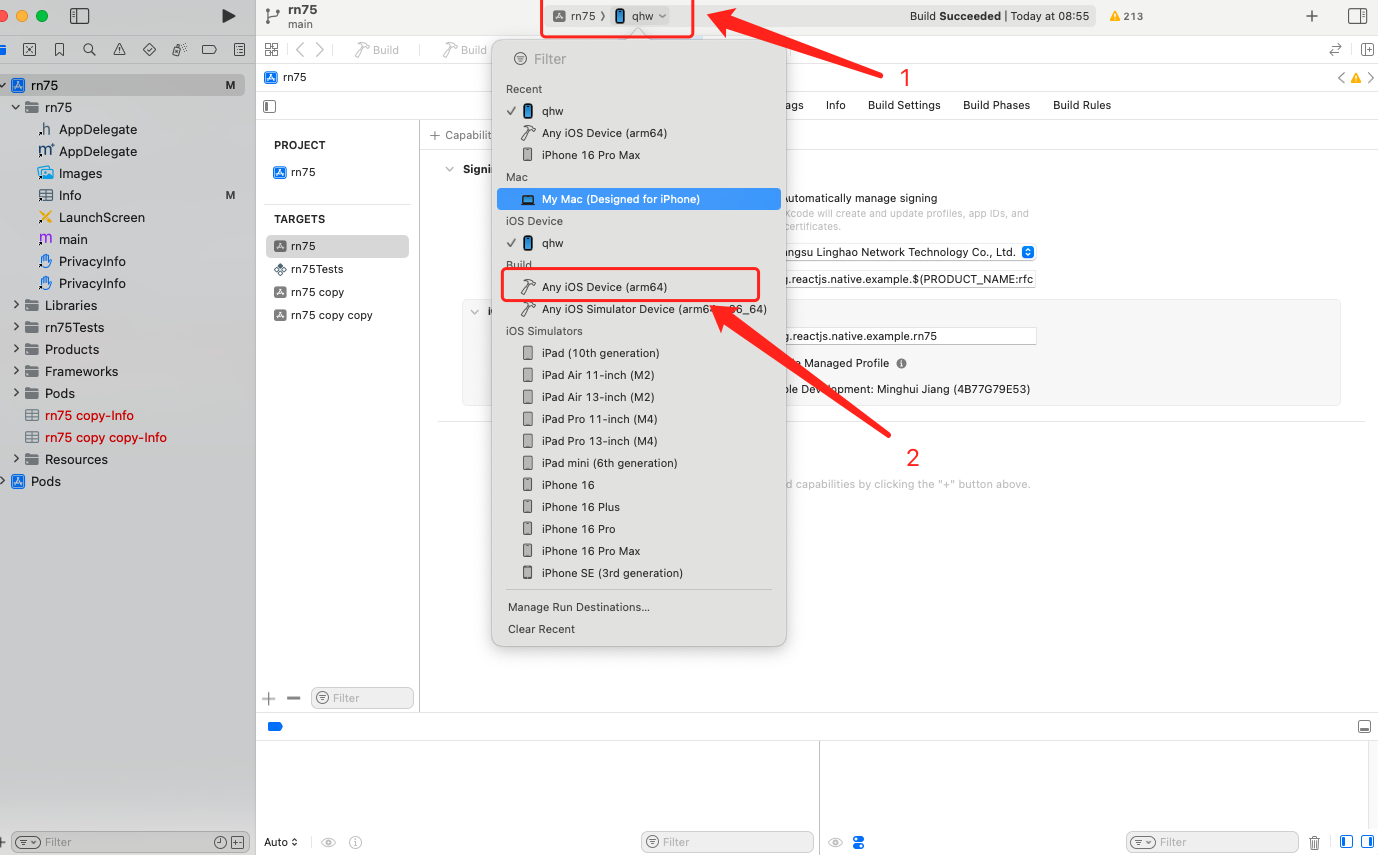
## 7.1 ios 打包
### 7.1.1 构建 iOS 存档
- `echo $ENV_OPTION`输出环境变量
- `-workspace ios/rn75.xcworkspace`指定 Xcode 项目的 workspace 文件(.xcworkspace)
- `-scheme rn75`指定要构建的 Scheme
- `archive`用于构建和创建 iOS 应用的存档文件
- `-archivePath app.xcarchive`指定存档文件的输出路径。app.xcarchive 是存档文件的名称和存放位置。
- `-destination generic/platform=iOS`指定构建的目标平台。
```
"build-ios-archive": "echo $ENV_OPTION && xcodebuild -workspace ios/rn75.xcworkspace -scheme rn75 archive -archivePath app.xcarchive -destination generic/platform=iOS",
```
### 7.1.2 构建.ipa 包
- `echo $ENV_OPTION`输出环境变量
- `-exportArchive -archivePath app.xcarchive`指定存档文件的路径
- `-exportPath ./build_ios`指定导出 .ipa 文件的目录路径。
- `-exportOptionsPlist export_options.plist`指定导出选项的配置文件(.plist 文件)
- `-allowProvisioningUpdates`允许 xcodebuild 在导出时自动更新和修复配置文件(provisioning profiles)以及证书(signing certificates)。
```
"build-ios-ipa": "echo $ENV_OPTION && xcodebuild -exportArchive -archivePath app.xcarchive -exportPath ./build_ios -exportOptionsPlist export_options.plist -allowProvisioningUpdates"
```
#### 7.1.2.1 如何生成 export_options.plist
- xocde 打开`rn75.xcworkspace`
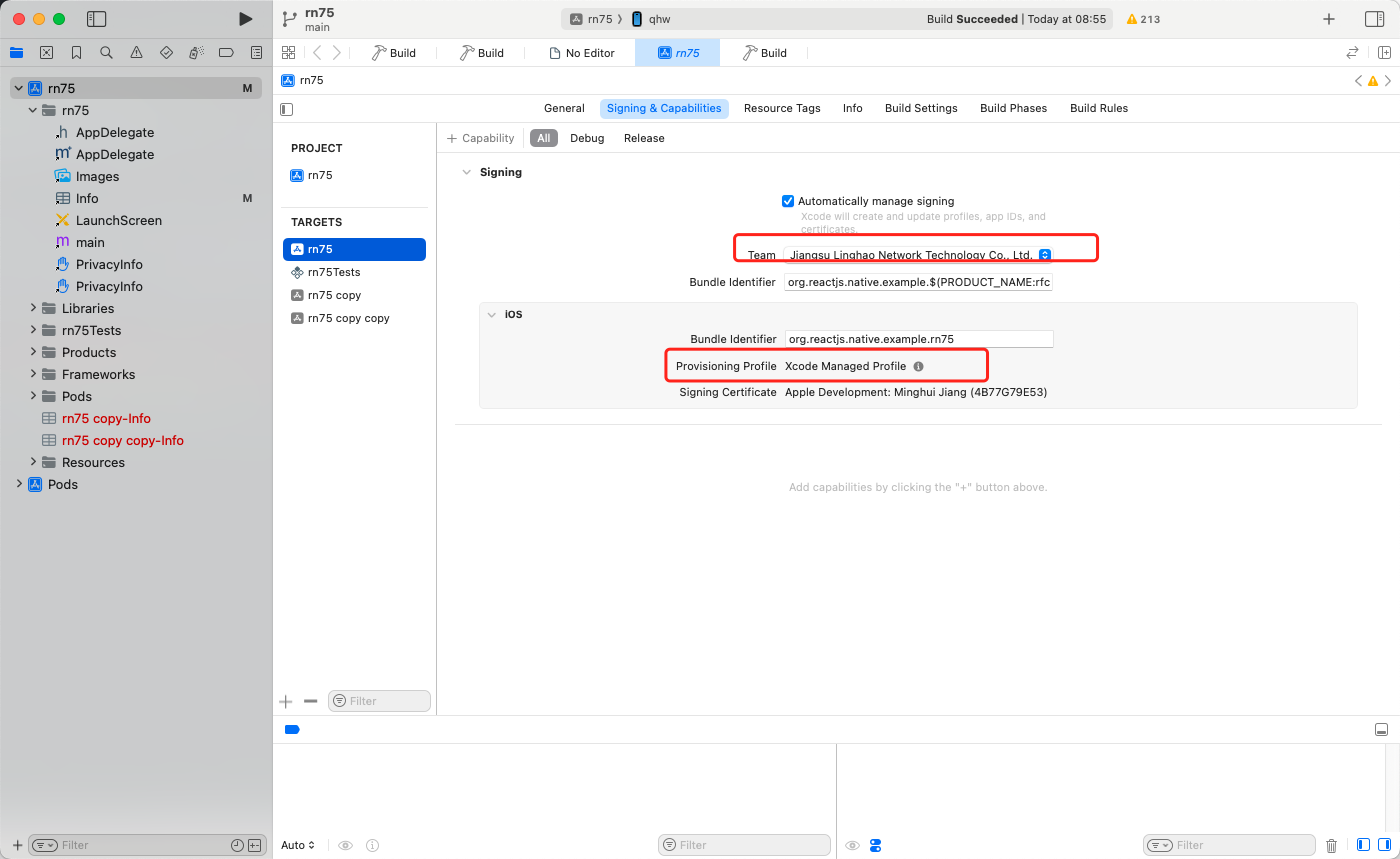
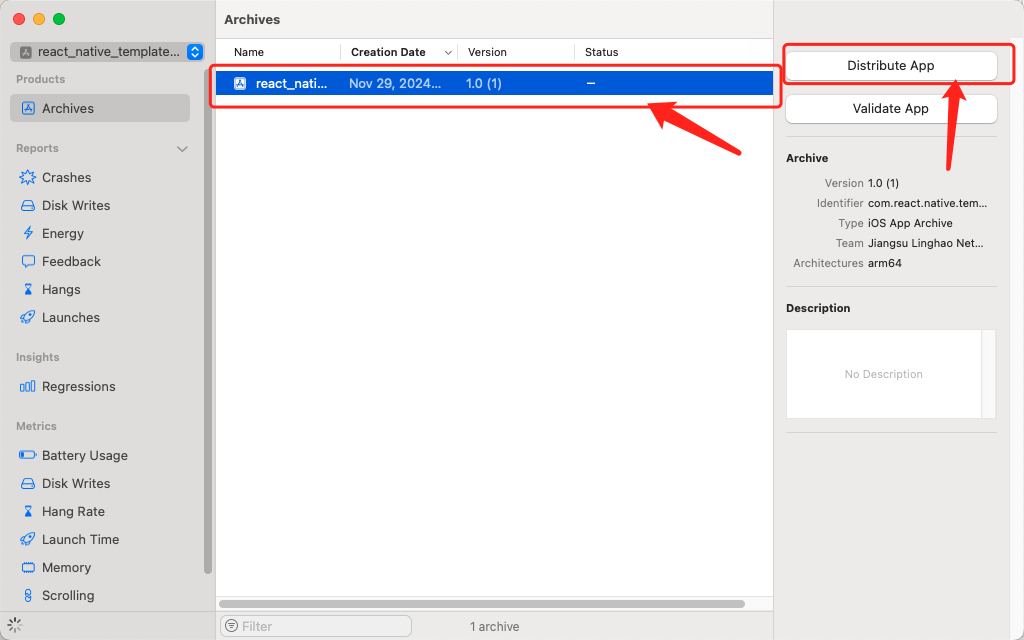
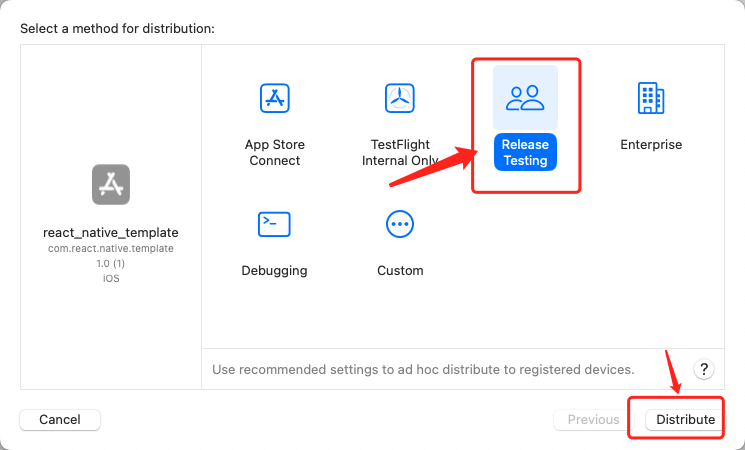
- 填写导出名称
- 打开导出文件夹拷贝`ExportOptions.plist`
### 7.1.3 build ios
```
"build-ios": "export ENV_OPTION=pro && cd ./ios && pod install && cd ../ && npm run build-ios-archive && npm run build-ios-ipa && rm -rf ./app.xcarchive",
```
## 7.2 android 打包
- `export ENV_OPTION=prd`设置环境变量
- `cd android`进入 android 目录执行`gradlew assembleRelease`
- `cp -r ./app/build/outputs`拷贝打包成功后的 build 文件到根目录下
- 重命名为`build_android`
```
"build-android": "export ENV_OPTION=prd && cd android && ./gradlew assembleRelease && cp -r ./app/build/outputs ../build_android",
```
# 8.APP 基础配置项
## 8.1 启动页
### 8.1.1 ios 启动页
- xocde 打开`rn75.xcworkspace`
- 进入 Images
- 新增`Image Set`
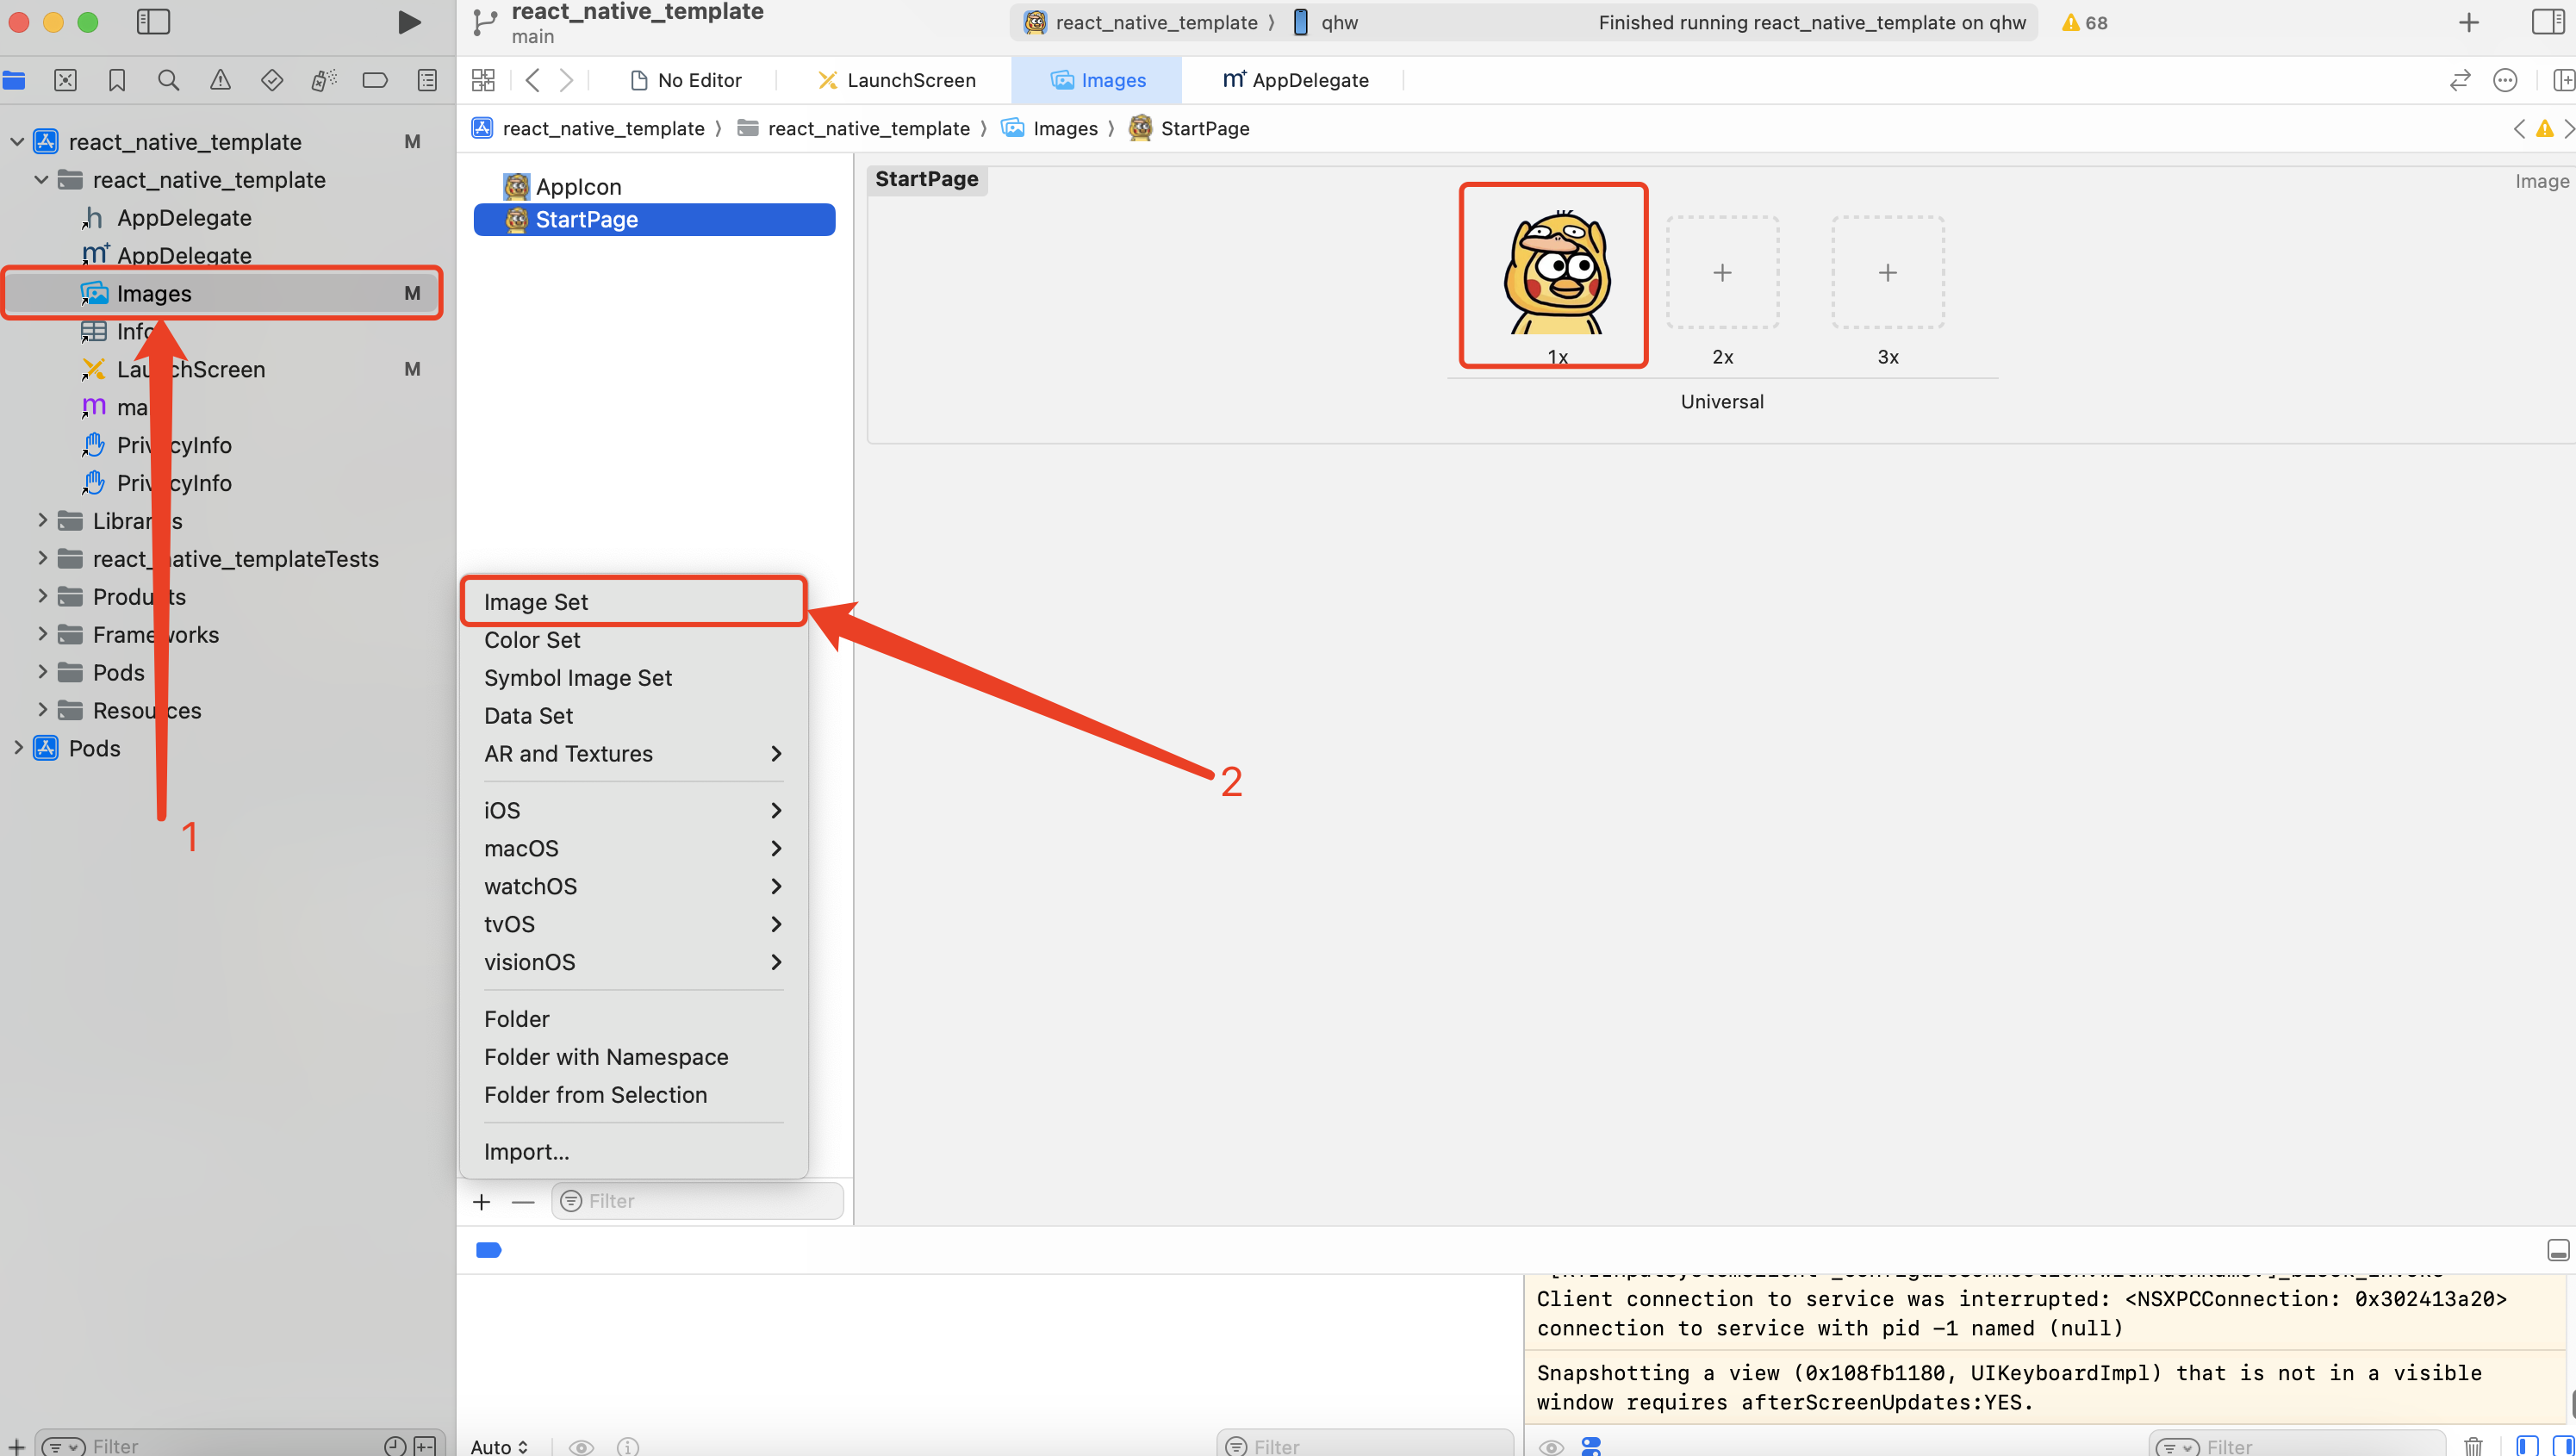
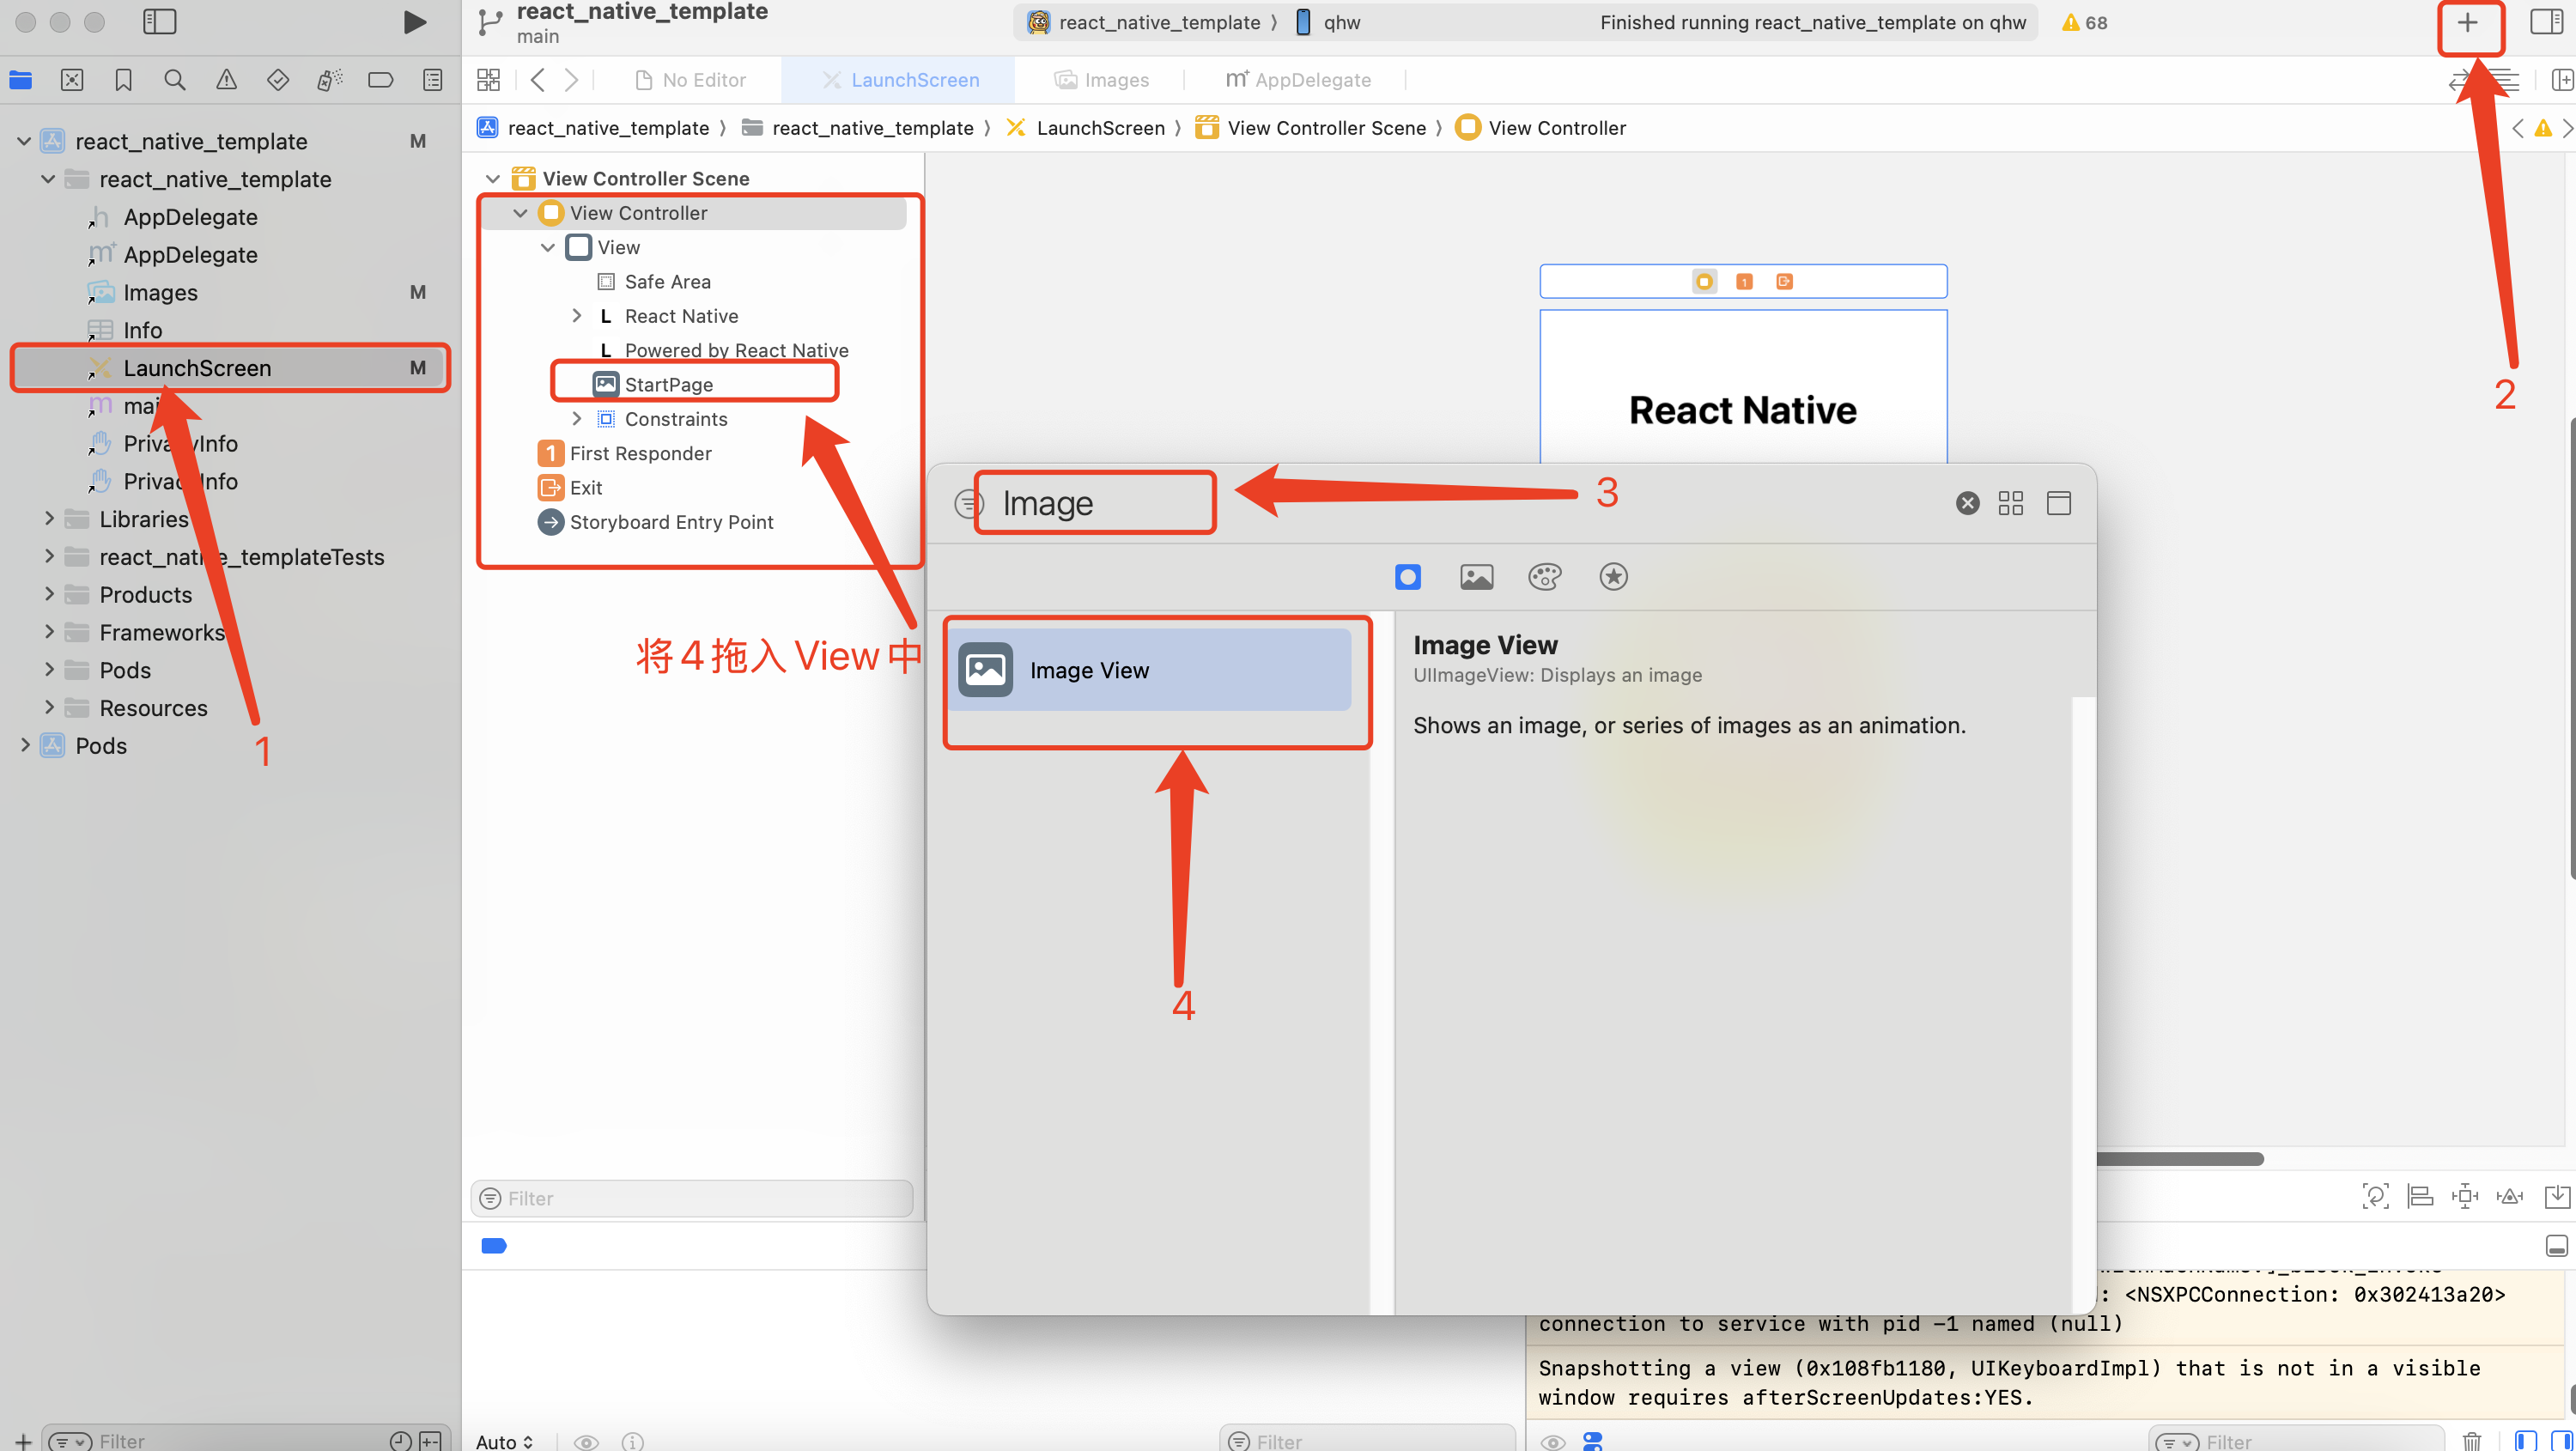
- 进入`LaunchScreen`
- 添加 Image 控件
- Image View -> Image 选择对应图片
- 选择`View Controller`进入右侧面板
- 选择 Simulated Metrics -> Size(Freeform)
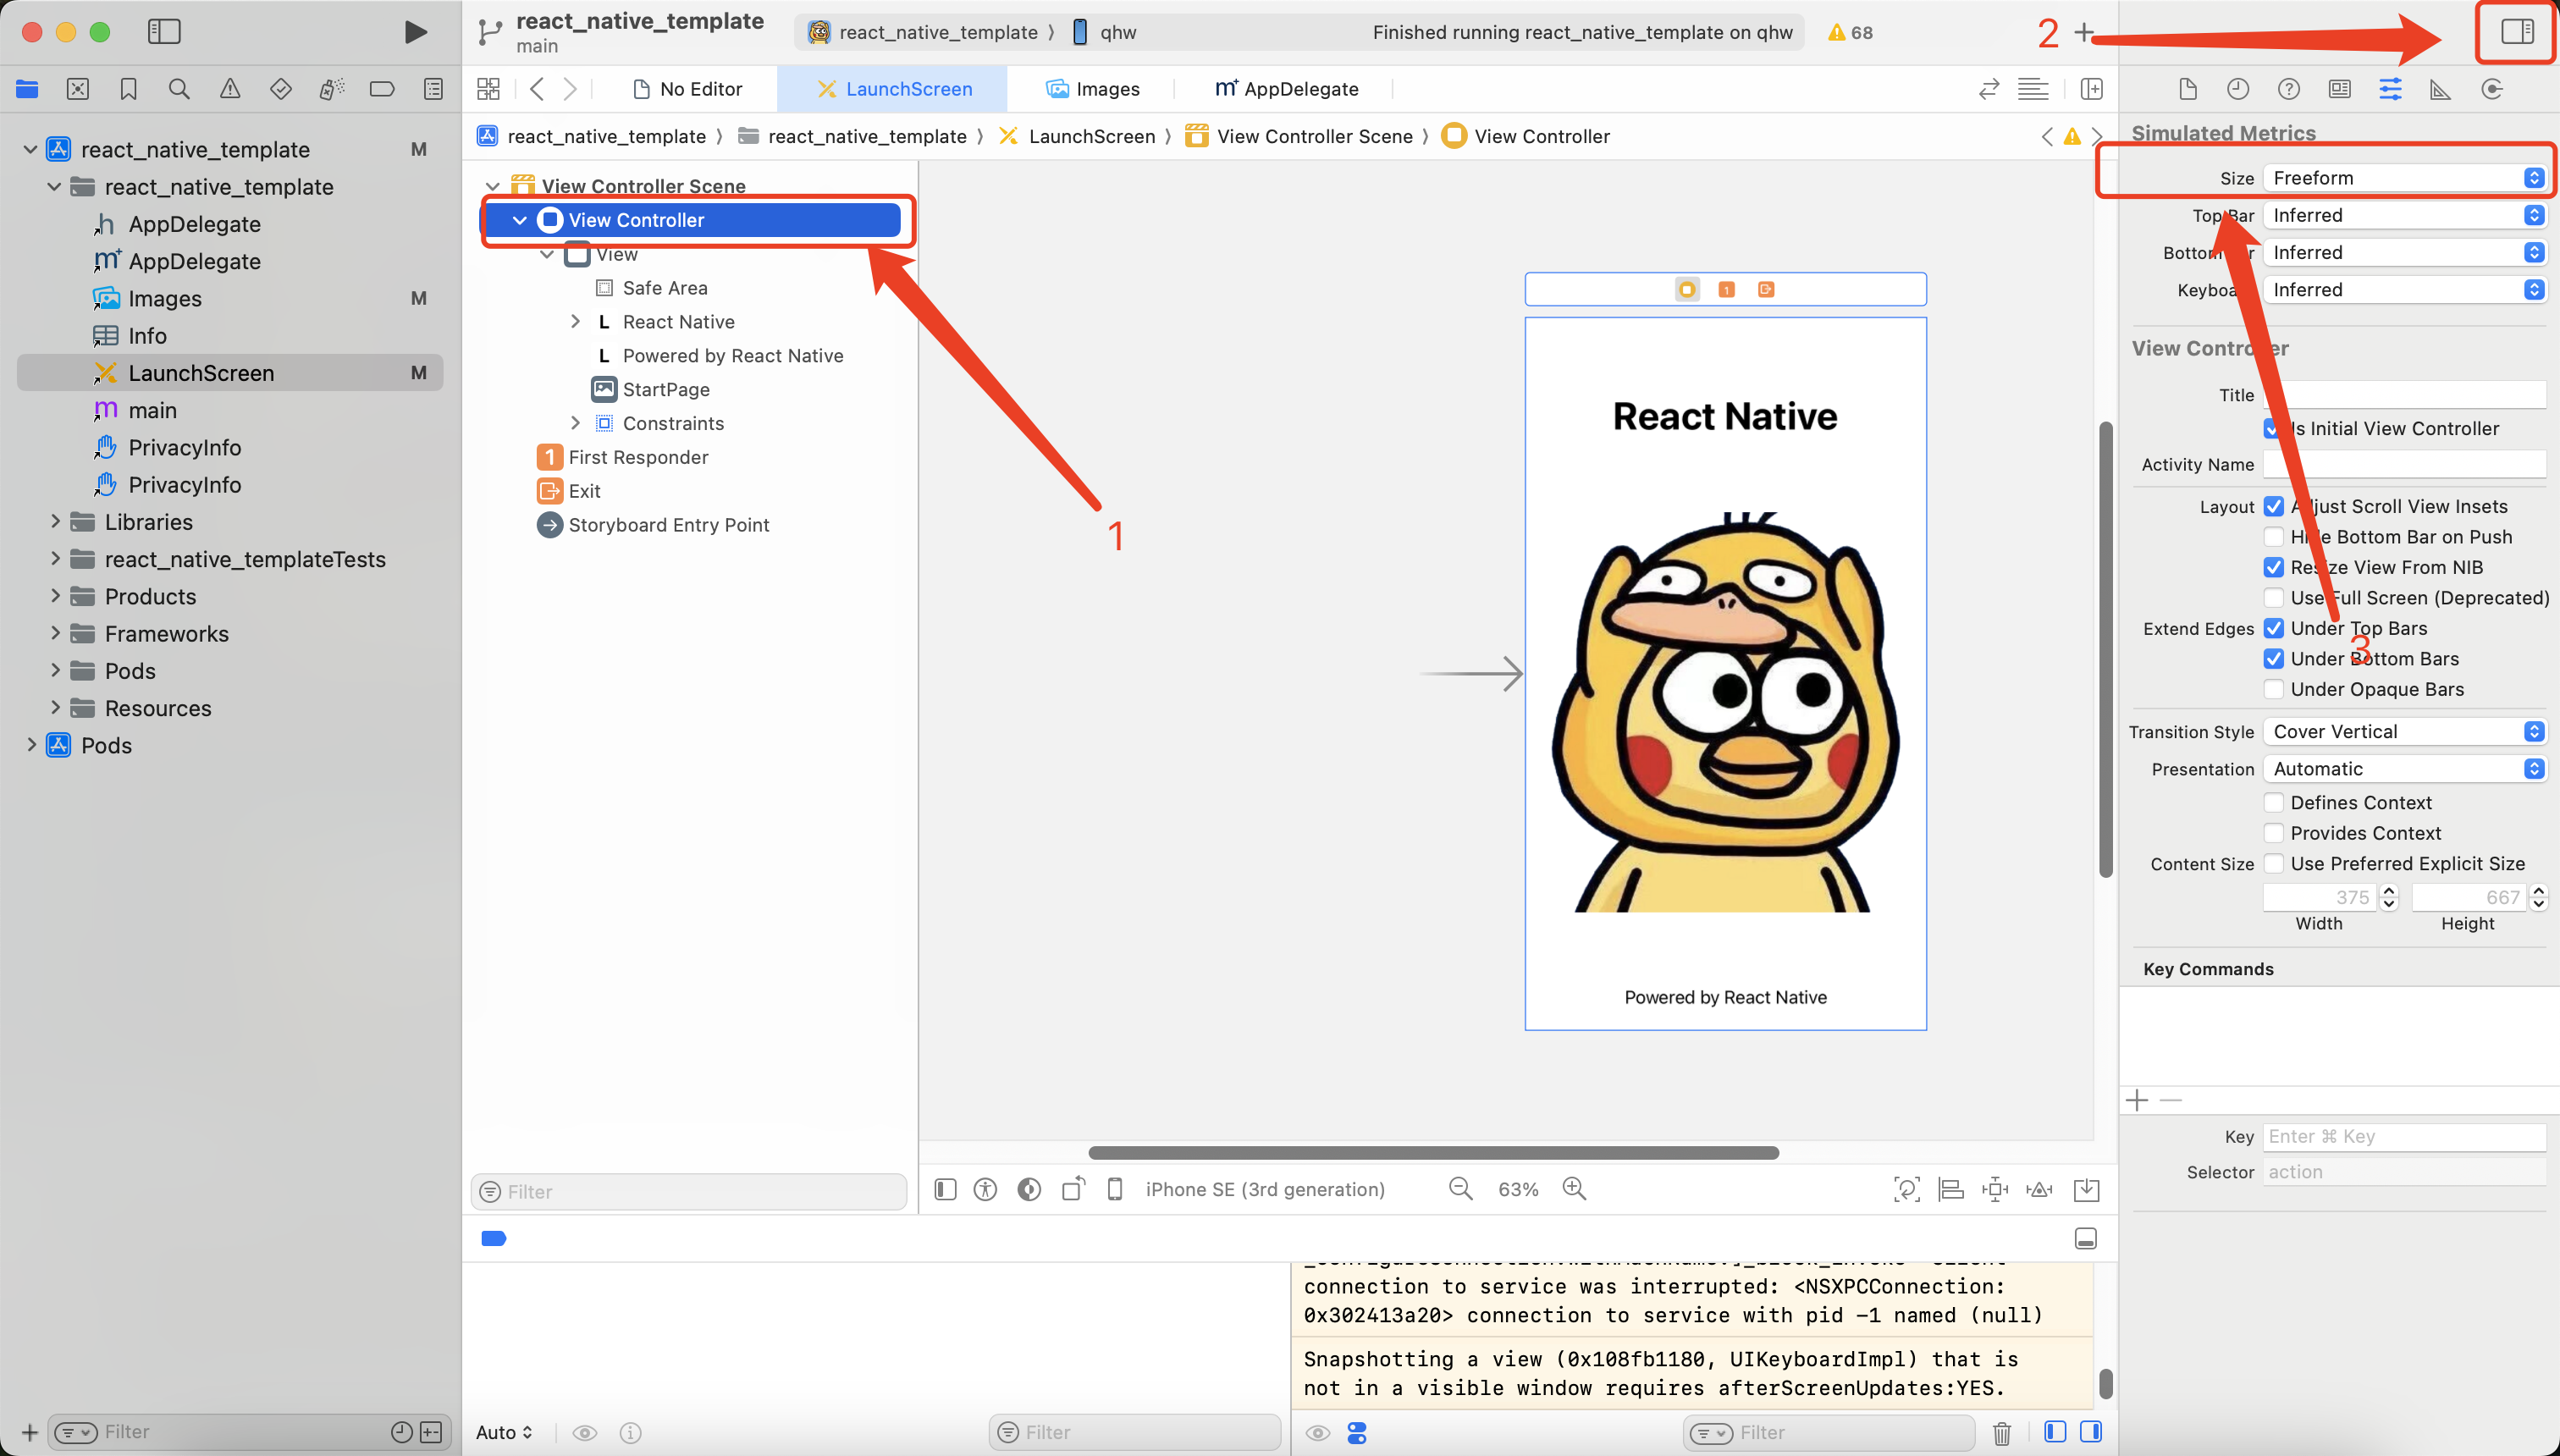
- 注意如果启动页未展示,请删除当前 app 后重启手机。
### 8.1.2 andriod 启动页
- 进入`app` -> `src` -> `main` -> `java` -> `com.react_native_template`
- 新建`SplashActivity.kt`启动页
- 在 `res` -> `layout`中新建`activity_splash.xml`
- 在`SplashActivity.kt`中将`setContentView()`方法中路劲替换为刚刚创建的 activity_splash.xml -使用`Handler(Looper.getMainLooper()).postDelayed({ startActivity(intent)}, 2000)`增加两秒延迟
```
package com.react_native_template
import android.content.Intent
import android.os.Bundle
import android.os.Handler
import android.os.Looper
import androidx.activity.enableEdgeToEdge
import androidx.appcompat.app.AppCompatActivity
import androidx.core.view.ViewCompat
import androidx.core.view.WindowInsetsCompat
class SplashActivity : AppCompatActivity() {
override fun onCreate(savedInstanceState: Bundle?) {
super.onCreate(savedInstanceState)
enableEdgeToEdge()
setContentView(R.layout.activity_splash)
ViewCompat.setOnApplyWindowInsetsListener(findViewById(R.id.main)) { v, insets ->
val systemBars = insets.getInsets(WindowInsetsCompat.Type.systemBars())
v.setPadding(systemBars.left, systemBars.top, systemBars.right, systemBars.bottom)
insets
}
val intent = Intent(this,MainActivity::class.java)
Handler(Looper.getMainLooper()).postDelayed({ startActivity(intent)}, 2000)
}
}
```
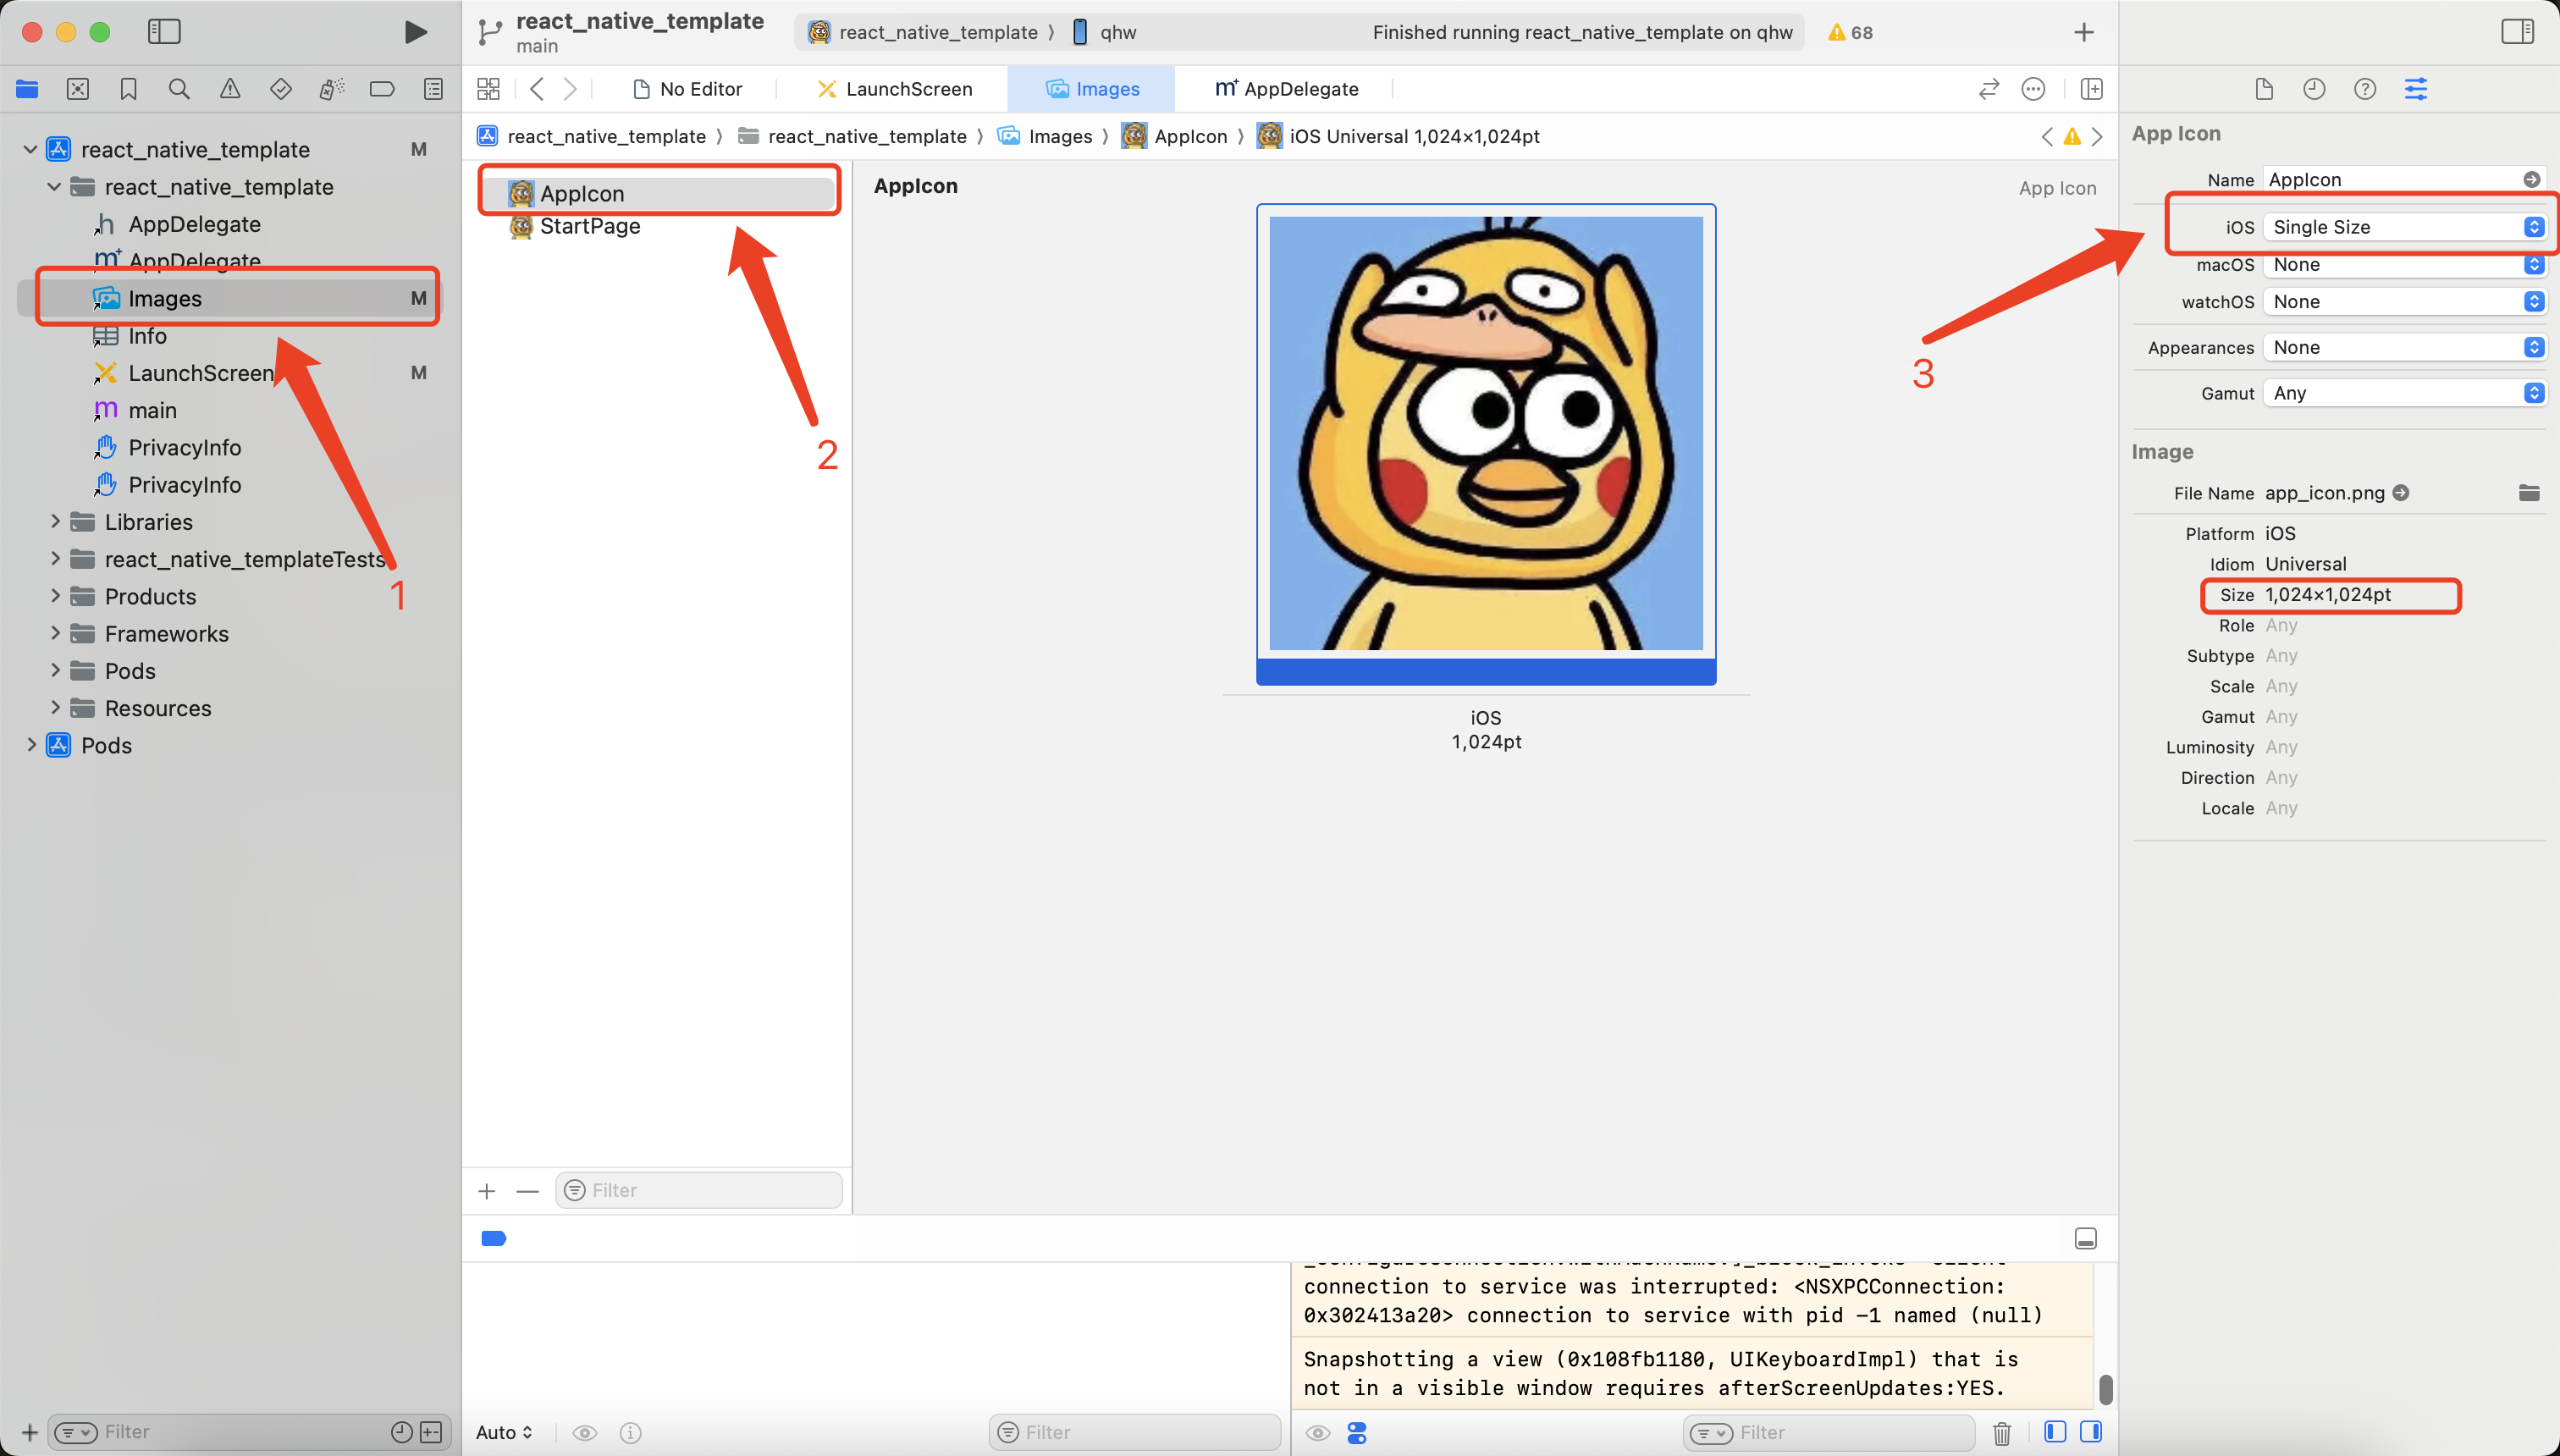
## 8.2 app 图标
### 8.2.1 ios 图标
- xocde 打开`rn75.xcworkspace`
- 进入 Images,选择 AppIcon
- 选择 App Icon -> IOS(Single Size)
- 注意图片规格为 1024\*1024
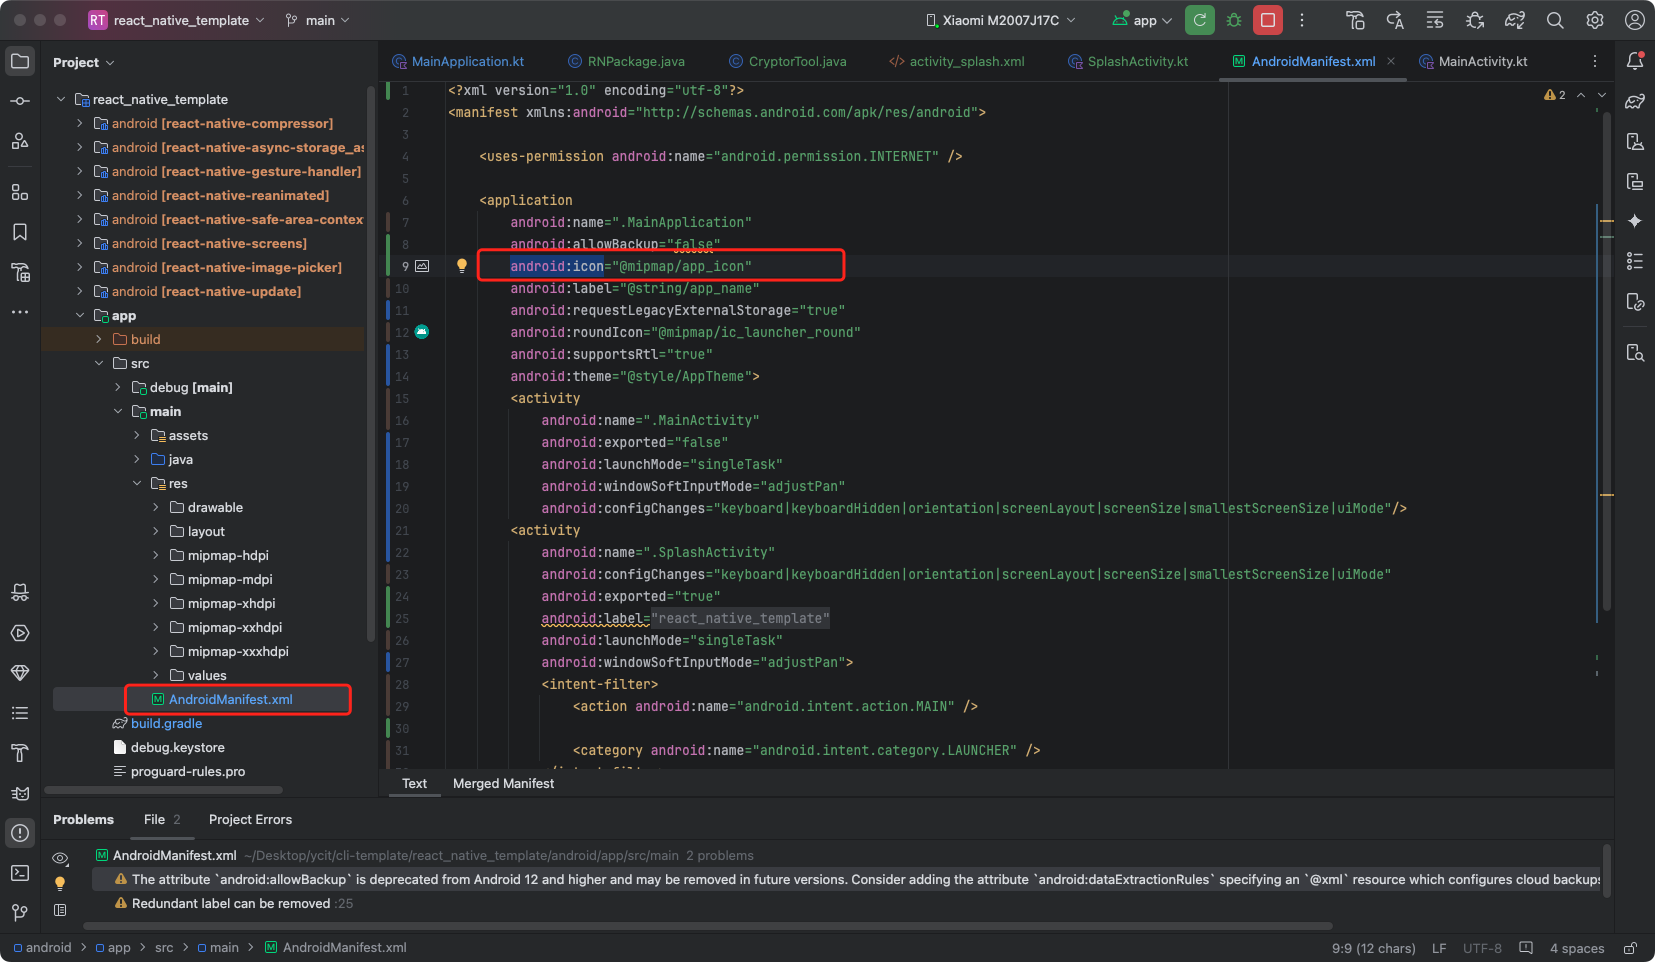
### 8.2.2 android 图标
- 进入`app` -> `src` -> `main` -> `res` -> `AndroidMainifest.xml`
- 找到`android:icon`
- 将其路径替换为`mipmap-dpi`中指定图片
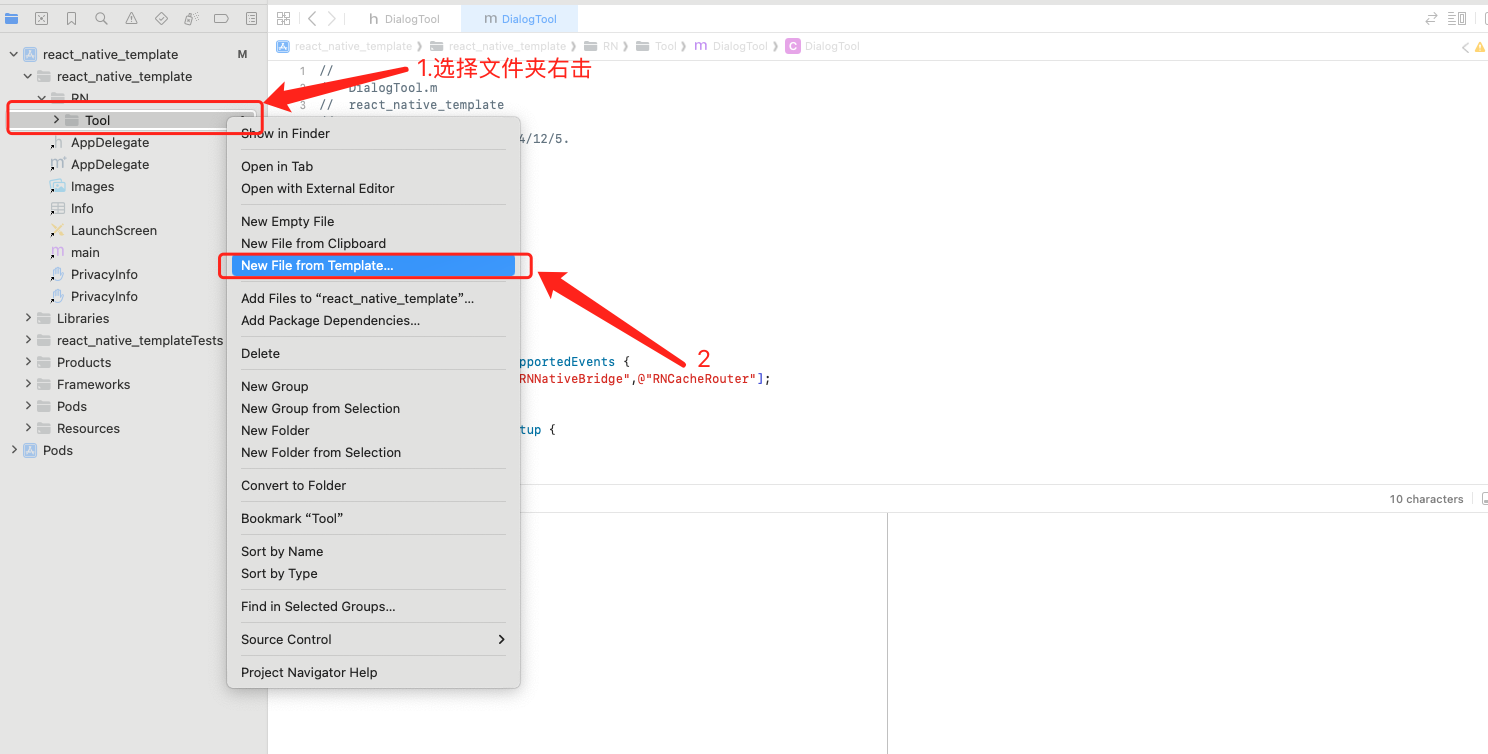
# 9. RN 调用原生方法
## 9.1 RN 调用 IOS 原生方法
- 新建文件
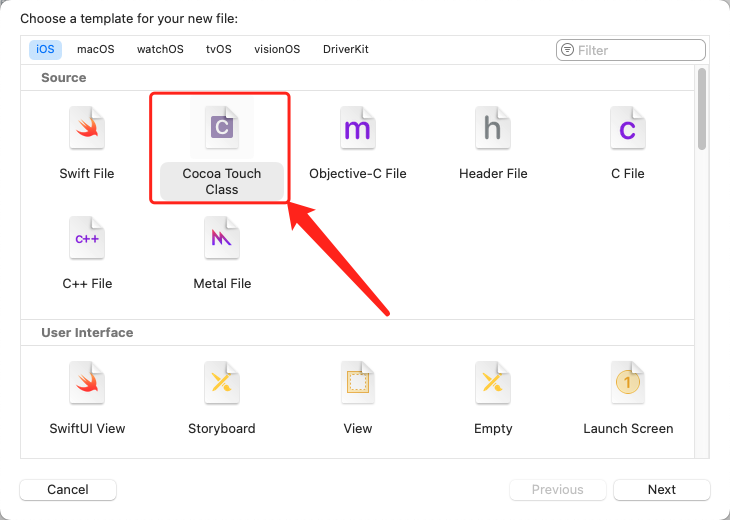
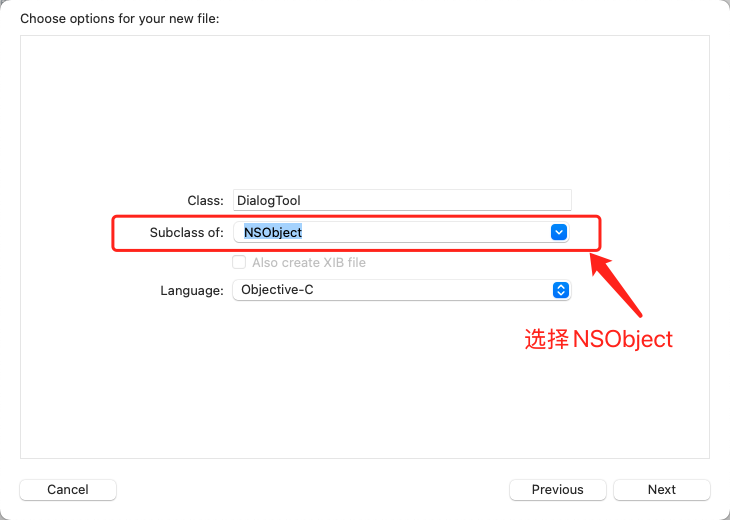
- 进入创建生成的.h 文件,添加如下代码
```
#import
#import
#import
NS_ASSUME_NONNULL_BEGIN
@interface DialogTool : RCTEventEmitter
@end
NS_ASSUME_NONNULL_END
```
- 进入生成的.m 文件,添加如下代码
```
//
// DialogTool.m
// react_native_template
//
// Created by 钱鸿玮 on 2024/12/5.
//
#import "DialogTool.h"
@implementation DialogTool
- (instancetype)init{
self = [super init];
return self;
}
- (NSArray *)supportedEvents {
return @[@"NativeData",@"RNNativeBridge",@"RNCacheRouter"];
}
+ (BOOL)requiresMainQueueSetup {
return true;
}
RCT_EXPORT_MODULE();
- (dispatch_queue_t)methodQueue {
return dispatch_get_main_queue();
}
// 创建一个可以从 JS 调用的函数,显示弹框
RCT_EXPORT_METHOD(showAlert:(NSString *)message resolver:(RCTPromiseResolveBlock)resolve rejecter:(RCTPromiseRejectBlock)reject)
{
// 创建弹框
UIAlertController *alertController = [UIAlertController alertControllerWithTitle:@"确认操作"
message:message
preferredStyle:UIAlertControllerStyleAlert];
// 取消按钮
UIAlertAction *cancelAction = [UIAlertAction actionWithTitle:@"取消"
style:UIAlertActionStyleCancel
handler:^(UIAlertAction * _Nonnull action) {
// 取消按钮点击时,调用 reject
reject(@"CANCELLED", @"User cancelled the operation", nil);
}];
// 确认按钮
UIAlertAction *okAction = [UIAlertAction actionWithTitle:@"确认"
style:UIAlertActionStyleDefault
handler:^(UIAlertAction * _Nonnull action) {
// 确认按钮点击时,调用 resolve
resolve(@"User confirmed the operation");
}];
// 添加按钮到弹框
[alertController addAction:cancelAction];
[alertController addAction:okAction];
// 获取当前视图控制器并展示弹框
UIViewController *rootViewController = [UIApplication sharedApplication].delegate.window.rootViewController;
[rootViewController presentViewController:alertController animated:YES completion:nil];
}
@end
```
- 进入 RN 页面
```
import {NativeModules} from 'react-native'
const {DialogTool} = NativeModules;
DialogTool.showAlert('IOS原生弹窗')
.then(message => {
console.log(message);
Modal.alert('提示', '你点击了IOS弹框的确认', [
{
text: '取消',
onPress: () => {},
style: 'cancel',
},
{
text: '退出',
onPress: () => {
Toast.show(`这是成功的返回:${message}`);
},
},
]);
})
.catch(error => {
Modal.alert('提示', '你点击了IOS弹框的取消', [
{
text: '取消',
onPress: () => {},
style: 'cancel',
},
{
text: '退出',
onPress: () => {
Toast.show(`这是失败的返回:${error.message}`);
},
},
]);
});
```
## 9.2 RN 调用 Android 原生方法
- 新增`NativeModule`文件继承`ReactContextBaseJavaModule`
- `getName()`定义 RN 通过 NativeModules 解构的名称
- `@ReactMethod`注解定义提供的方法名称
```
package com.react_native_template.RN.Tool;
import com.facebook.react.bridge.Promise;
import com.facebook.react.bridge.ReactApplicationContext;
import com.facebook.react.bridge.ReactContextBaseJavaModule;
import com.facebook.react.bridge.ReactMethod;
import javax.annotation.Nonnull;
public class CryptorTool extends ReactContextBaseJavaModule {
public static ReactApplicationContext mContext;
public CryptorTool(@Nonnull ReactApplicationContext reactContext) {
super(reactContext);
mContext = reactContext;
}
@Nonnull
@Override
public String getName() {
return "CryptorTool";
}
@ReactMethod
public void test(Promise promise){
}
}
```
- 新建 `RNPackage.java`文件 实现`createNativeModules`方法

```
package com.react_native_template.RN;
import androidx.annotation.NonNull;
import com.facebook.react.ReactPackage;
import com.facebook.react.bridge.NativeModule;
import com.facebook.react.bridge.ReactApplicationContext;
import com.facebook.react.uimanager.ViewManager;
import com.react_native_template.RN.Tool.CryptorTool;
import java.util.Collections;
import java.util.List;
public class RNPackage implements ReactPackage {
@NonNull
@Override
public List createNativeModules(@NonNull ReactApplicationContext reactApplicationContext) {
List modules = new ArrayList<>();
modules.add(new CryptorTool(reactApplicationContext));
return modules;
}
@NonNull
@Override
public List createViewManagers(@NonNull ReactApplicationContext reactApplicationContext) {
return Collections.emptyList();
}
}
```
- 在`MainApplication`的`getPackages()`中添加如下代码
```
add(RNPackage())
```
# 10. 热更新
- [PUSHY 地址:https://pushy.reactnative.cn/docs/getting-started](https://pushy.reactnative.cn/docs/getting-started)