# warp-drive
**Repository Path**: AngryPanda_XYZ/warp-drive
## Basic Information
- **Project Name**: warp-drive
- **Description**: Extremely Fast End-to-End Deep Multi-Agent Reinforcement Learning Framework on a GPU
- **Primary Language**: Python
- **License**: BSD-3-Clause
- **Default Branch**: master
- **Homepage**: https://github.com/salesforce/warp-drive
- **GVP Project**: No
## Statistics
- **Stars**: 1
- **Forks**: 0
- **Created**: 2021-09-26
- **Last Updated**: 2022-07-08
## Categories & Tags
**Categories**: Uncategorized
**Tags**: 待处理的项目
## README
# WarpDrive: Extremely Fast End-to-End Deep Multi-Agent Reinforcement Learning on a GPU
WarpDrive is a flexible, lightweight, and easy-to-use open-source reinforcement learning (RL)
framework that implements end-to-end multi-agent RL on a single GPU (Graphics Processing Unit).
Using the extreme parallelization capability of GPUs, WarpDrive enables orders-of-magnitude
faster RL compared to CPU simulation + GPU model implementations. It is extremely efficient as it avoids back-and-forth data copying between the CPU and the GPU,
and runs simulations across multiple agents and multiple environment replicas in parallel.
Together, this allows the user to run thousands of concurrent multi-agent simulations and train
on extremely large batches of experience, achieving over 100x throughput over CPU-based counterparts.
Our current release includes several multi-agent environments
based on the game of "Tag", where taggers are trying to run after
and tag the runners. More environments will be added soon!
Below, we show multi-agent RL policies
trained for different tagger:runner speed ratios using WarpDrive.
These environments can **run** at **millions of steps per second**,
and **train** in just a few **hours**, all on a single GPU!


 WarpDrive also provides tools to build and train
multi-agent RL systems quickly with just a few lines of code.
Here is a short example to train tagger and runner agents:
```python
# Create a wrapped environment object via the EnvWrapper
# Ensure that use_cuda is set to True (in order to run on the GPU)
env_wrapper = EnvWrapper(
TagContinuous(**run_config["env"]),
num_envs=run_config["trainer"]["num_envs"],
use_cuda=True
)
# Agents can share policy models: this dictionary maps policy model names to agent ids.
policy_tag_to_agent_id_map = {
"tagger": list(env_wrapper.env.taggers),
"runner": list(env_wrapper.env.runners),
}
# Create the trainer object
trainer = Trainer(
env_wrapper=env_wrapper,
config=run_config,
policy_tag_to_agent_id_map=policy_tag_to_agent_id_map,
)
# Create and push data placeholders to the device
create_and_push_data_placeholders(
env_wrapper,
policy_tag_to_agent_id_map,
trainer
)
# Perform training!
trainer.train()
```
## Code Structure
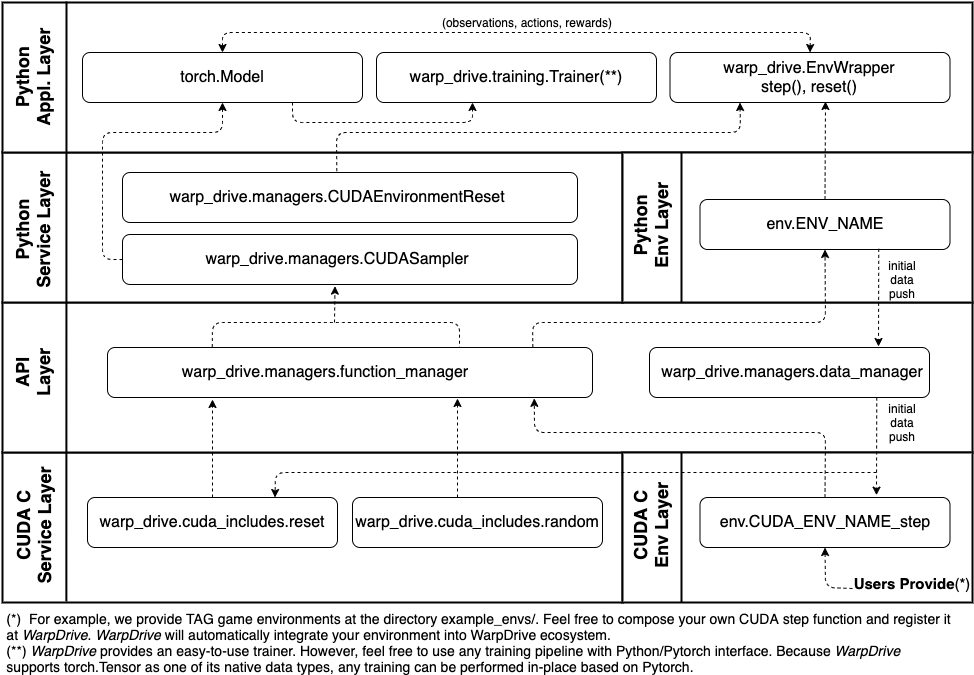
WarpDrive provides a CUDA + Python framework and quality-of-life tools so you can quickly build fast and flexible multi-agent RL systems. The following figure illustrates a bottoms-up overview of the design and components of WarpDrive. The user only needs to write a CUDA step function at the CUDA environment layer, while the rest is a pure Python interface. We have step by step tutorials for you to master the workflow.
WarpDrive also provides tools to build and train
multi-agent RL systems quickly with just a few lines of code.
Here is a short example to train tagger and runner agents:
```python
# Create a wrapped environment object via the EnvWrapper
# Ensure that use_cuda is set to True (in order to run on the GPU)
env_wrapper = EnvWrapper(
TagContinuous(**run_config["env"]),
num_envs=run_config["trainer"]["num_envs"],
use_cuda=True
)
# Agents can share policy models: this dictionary maps policy model names to agent ids.
policy_tag_to_agent_id_map = {
"tagger": list(env_wrapper.env.taggers),
"runner": list(env_wrapper.env.runners),
}
# Create the trainer object
trainer = Trainer(
env_wrapper=env_wrapper,
config=run_config,
policy_tag_to_agent_id_map=policy_tag_to_agent_id_map,
)
# Create and push data placeholders to the device
create_and_push_data_placeholders(
env_wrapper,
policy_tag_to_agent_id_map,
trainer
)
# Perform training!
trainer.train()
```
## Code Structure
WarpDrive provides a CUDA + Python framework and quality-of-life tools so you can quickly build fast and flexible multi-agent RL systems. The following figure illustrates a bottoms-up overview of the design and components of WarpDrive. The user only needs to write a CUDA step function at the CUDA environment layer, while the rest is a pure Python interface. We have step by step tutorials for you to master the workflow.
 ## White Paper and Citing WarpDrive
You can find more details in our white paper: [https://arxiv.org/abs/2108.13976](https://arxiv.org/abs/2108.13976).
If you're using WarpDrive in your research or applications, please cite using this BibTeX:
```
@misc{lan2021warpdrive,
title={WarpDrive: Extremely Fast End-to-End Deep Multi-Agent Reinforcement Learning on a GPU},
author={Tian Lan and Sunil Srinivasa and Huan Wang and Caiming Xiong and Silvio Savarese and Stephan Zheng},
year={2021},
eprint={2108.13976},
archivePrefix={arXiv},
primaryClass={cs.LG}
}
```
## Tutorials and Quick Start
Familiarize yourself with WarpDrive by running these tutorials on Colab!
- [A simple end-to-end RL training example](http://colab.research.google.com/github/salesforce/warp-drive/blob/master/tutorials/simple-end-to-end-example.ipynb): Explains how to get started with
multi-agent RL training with just a few lines of code.
- [WarpDrive basics](http://colab.research.google.com/github/salesforce/warp-drive/blob/master/tutorials/tutorial-1-warp_drive_basics.ipynb): Explains the basics of Python APIs in the host managing the
CUDA data and kernel functions in the GPU.
- [WarpDrive sampler](http://colab.research.google.com/github/salesforce/warp-drive/blob/master/tutorials/tutorial-2-warp_drive_sampler.ipynb): Explains Python APIs controlling the GPU action sampler.
- [WarpDrive resetter and logger](http://colab.research.google.com/github/salesforce/warp-drive/blob/master/tutorials/tutorial-3_warp_drive_reset_and_log.ipynb): Explains Python APIs controlling the GPU
environment resetter and rollout history logger.
- [Create custom environments](http://colab.research.google.com/github/salesforce/warp-drive/blob/master/tutorials/tutorial-4-create_custom_environments.ipynb): Explains how to create your own custom RL
environment in CUDA C, and integrate it with WarpDrive.
- [Training with WarpDrive](http://colab.research.google.com/github/salesforce/warp-drive/blob/master/tutorials/tutorial-5-training_with_warp_drive.ipynb): Explains how to train your environment on the
GPU.
Note: You may also run these [tutorials](www.github.com/salesforce/warp-drive/blob/master/tutorials) *locally*, but you will need a GPU machine with nvcc compiler installed
and a compatible Nvidia GPU driver. You will also need [Jupyter](https://jupyter.org).
See [https://jupyter.readthedocs.io/en/latest/install.html](https://jupyter.readthedocs.io/en/latest/install.html) for installation instructions
You can find full reference documentation [here](http://opensource.salesforce.com/warp-drive/).
## Installation Instructions
To get started, you'll need to have **Python 3.7+** and the **nvcc** compiler installed
with a compatible Nvidia GPU CUDA driver.
CUDA (which includes nvcc) can be installed by following Nvidia's instructions here: [https://developer.nvidia.com/cuda-downloads](https://developer.nvidia.com/cuda-downloads).
### Docker Image
You can refer to the [example Dockerfile](https://github.com/salesforce/warp-drive/blob/master/Dockerfile) to configure your system.
In particular, we suggest you visit [Nvidia Docker Hub](https://hub.docker.com/r/nvidia/cuda) to download the CUDA and cuDNN images compatible with your system.
You should be able to use the command line utility to monitor the NVIDIA GPU devices in your system:
```pyfunctiontypecomment
nvidia-smi
```
and see something like this
```pyfunctiontypecomment
+-----------------------------------------------------------------------------+
| NVIDIA-SMI 450.51.06 Driver Version: 450.51.06 CUDA Version: 11.0 |
|-------------------------------+----------------------+----------------------+
| GPU Name Persistence-M| Bus-Id Disp.A | Volatile Uncorr. ECC |
| Fan Temp Perf Pwr:Usage/Cap| Memory-Usage | GPU-Util Compute M. |
| | | MIG M. |
|===============================+======================+======================|
| 0 Tesla V100-SXM2... Off | 00000000:00:04.0 Off | 0 |
| N/A 37C P0 32W / 300W | 0MiB / 16160MiB | 0% Default |
| | | N/A |
+-------------------------------+----------------------+----------------------+
+-----------------------------------------------------------------------------+
| Processes: |
| GPU GI CI PID Type Process name GPU Memory |
| ID ID Usage |
|=============================================================================|
| No running processes found |
+-----------------------------------------------------------------------------+
```
In this snapshot, you can see we are using a Tesla V100 GPU and CUDA version 11.0.
### Installing using Pip
You can install WarpDrive using the Python package manager:
```pyfunctiontypecomment
pip install rl_warp_drive
```
### Installing from Source
1. Clone this repository to your machine:
```
git clone www.github.com/salesforce/warp-drive
```
2. *Optional, but recommended for first tries:* Create a new conda environment (named "warp_drive" below) and activate it:
```
conda create --name warp_drive python=3.7 --yes
conda activate warp_drive
```
3. Install as an editable Python package:
```pyfunctiontypecomment
cd warp_drive
pip install -e .
```
### Testing your Installation
To test your installation, try running from the root directory:
```
conda activate warp_drive
cd warp_drive/cuda_includes
make compile-test
```
Running `make compile-test` will compile the core service source code into a CUDA binary and place it
in a `bin` folder, and additionally, run some unit tests.
Equivalently, you can call directly from Python command
```
python warp_drive/utils/unittest_run.py
```
## Learn More
For more information, please check out our [blog](https://blog.einstein.ai/warpdrive-fast-rl-on-a-gpu/), [white paper](https://arxiv.org/abs/2108.13976), and code [documentation](http://opensource.salesforce.com/warp-drive/).
If you're interested in extending this framework, or have questions, join the
AI Economist Slack channel using this
[invite link](https://join.slack.com/t/aieconomist/shared_invite/zt-g71ajic7-XaMygwNIup~CCzaR1T0wgA).
## White Paper and Citing WarpDrive
You can find more details in our white paper: [https://arxiv.org/abs/2108.13976](https://arxiv.org/abs/2108.13976).
If you're using WarpDrive in your research or applications, please cite using this BibTeX:
```
@misc{lan2021warpdrive,
title={WarpDrive: Extremely Fast End-to-End Deep Multi-Agent Reinforcement Learning on a GPU},
author={Tian Lan and Sunil Srinivasa and Huan Wang and Caiming Xiong and Silvio Savarese and Stephan Zheng},
year={2021},
eprint={2108.13976},
archivePrefix={arXiv},
primaryClass={cs.LG}
}
```
## Tutorials and Quick Start
Familiarize yourself with WarpDrive by running these tutorials on Colab!
- [A simple end-to-end RL training example](http://colab.research.google.com/github/salesforce/warp-drive/blob/master/tutorials/simple-end-to-end-example.ipynb): Explains how to get started with
multi-agent RL training with just a few lines of code.
- [WarpDrive basics](http://colab.research.google.com/github/salesforce/warp-drive/blob/master/tutorials/tutorial-1-warp_drive_basics.ipynb): Explains the basics of Python APIs in the host managing the
CUDA data and kernel functions in the GPU.
- [WarpDrive sampler](http://colab.research.google.com/github/salesforce/warp-drive/blob/master/tutorials/tutorial-2-warp_drive_sampler.ipynb): Explains Python APIs controlling the GPU action sampler.
- [WarpDrive resetter and logger](http://colab.research.google.com/github/salesforce/warp-drive/blob/master/tutorials/tutorial-3_warp_drive_reset_and_log.ipynb): Explains Python APIs controlling the GPU
environment resetter and rollout history logger.
- [Create custom environments](http://colab.research.google.com/github/salesforce/warp-drive/blob/master/tutorials/tutorial-4-create_custom_environments.ipynb): Explains how to create your own custom RL
environment in CUDA C, and integrate it with WarpDrive.
- [Training with WarpDrive](http://colab.research.google.com/github/salesforce/warp-drive/blob/master/tutorials/tutorial-5-training_with_warp_drive.ipynb): Explains how to train your environment on the
GPU.
Note: You may also run these [tutorials](www.github.com/salesforce/warp-drive/blob/master/tutorials) *locally*, but you will need a GPU machine with nvcc compiler installed
and a compatible Nvidia GPU driver. You will also need [Jupyter](https://jupyter.org).
See [https://jupyter.readthedocs.io/en/latest/install.html](https://jupyter.readthedocs.io/en/latest/install.html) for installation instructions
You can find full reference documentation [here](http://opensource.salesforce.com/warp-drive/).
## Installation Instructions
To get started, you'll need to have **Python 3.7+** and the **nvcc** compiler installed
with a compatible Nvidia GPU CUDA driver.
CUDA (which includes nvcc) can be installed by following Nvidia's instructions here: [https://developer.nvidia.com/cuda-downloads](https://developer.nvidia.com/cuda-downloads).
### Docker Image
You can refer to the [example Dockerfile](https://github.com/salesforce/warp-drive/blob/master/Dockerfile) to configure your system.
In particular, we suggest you visit [Nvidia Docker Hub](https://hub.docker.com/r/nvidia/cuda) to download the CUDA and cuDNN images compatible with your system.
You should be able to use the command line utility to monitor the NVIDIA GPU devices in your system:
```pyfunctiontypecomment
nvidia-smi
```
and see something like this
```pyfunctiontypecomment
+-----------------------------------------------------------------------------+
| NVIDIA-SMI 450.51.06 Driver Version: 450.51.06 CUDA Version: 11.0 |
|-------------------------------+----------------------+----------------------+
| GPU Name Persistence-M| Bus-Id Disp.A | Volatile Uncorr. ECC |
| Fan Temp Perf Pwr:Usage/Cap| Memory-Usage | GPU-Util Compute M. |
| | | MIG M. |
|===============================+======================+======================|
| 0 Tesla V100-SXM2... Off | 00000000:00:04.0 Off | 0 |
| N/A 37C P0 32W / 300W | 0MiB / 16160MiB | 0% Default |
| | | N/A |
+-------------------------------+----------------------+----------------------+
+-----------------------------------------------------------------------------+
| Processes: |
| GPU GI CI PID Type Process name GPU Memory |
| ID ID Usage |
|=============================================================================|
| No running processes found |
+-----------------------------------------------------------------------------+
```
In this snapshot, you can see we are using a Tesla V100 GPU and CUDA version 11.0.
### Installing using Pip
You can install WarpDrive using the Python package manager:
```pyfunctiontypecomment
pip install rl_warp_drive
```
### Installing from Source
1. Clone this repository to your machine:
```
git clone www.github.com/salesforce/warp-drive
```
2. *Optional, but recommended for first tries:* Create a new conda environment (named "warp_drive" below) and activate it:
```
conda create --name warp_drive python=3.7 --yes
conda activate warp_drive
```
3. Install as an editable Python package:
```pyfunctiontypecomment
cd warp_drive
pip install -e .
```
### Testing your Installation
To test your installation, try running from the root directory:
```
conda activate warp_drive
cd warp_drive/cuda_includes
make compile-test
```
Running `make compile-test` will compile the core service source code into a CUDA binary and place it
in a `bin` folder, and additionally, run some unit tests.
Equivalently, you can call directly from Python command
```
python warp_drive/utils/unittest_run.py
```
## Learn More
For more information, please check out our [blog](https://blog.einstein.ai/warpdrive-fast-rl-on-a-gpu/), [white paper](https://arxiv.org/abs/2108.13976), and code [documentation](http://opensource.salesforce.com/warp-drive/).
If you're interested in extending this framework, or have questions, join the
AI Economist Slack channel using this
[invite link](https://join.slack.com/t/aieconomist/shared_invite/zt-g71ajic7-XaMygwNIup~CCzaR1T0wgA).